
Line breaks usually help a writer end a line and begin or continue the text in another line. It, therefore, helps to separate paragraphs in a document. This is usually convenient when writing poems or songs. A paragraph is a little bit different. It has some extra space above and below it which helps to separate one paragraph from another. A page line break has no space or, rather, very little space in between. The following article gives you steps you can use to add a line break to your Word document.
Steps to follow;
1. Open a Word document.
2. Locate the area you want to add a line break and click on it.
3. Press on Shift + Enter to insert a line break. Notice that a line break is smaller than the space you create when you press the Enter button alone.

Getting rid of a line break entails pressing the backspace button just once.
You can keep the lines in a paragraph together by avoiding spacing by following the following simple steps.
1. Highlight the paragraph
2. Open the Home Tab in the Menu.
3. Click on Paragraph Dialog Box.

4. Click on Line and page breaks.

5. On Pagination, click on the choice Keep lines Together.

6. Now press OK.
You can also suppress numbered lines or paragraphs by following the following simple steps.
1. Highlight the paragraphs or lines you want to suppress or compress.
2. Open Home Tab in the Menu.
3. Choose Paragraph Dialog Box.
4. Click on Line and Page Breaks
5. Click on Formatting, then Suppress line numbers.

6. Press OK.
Line breaks can also help to control widow and orphan lines. It is important to note that a widow line is the last line of a paragraph left by itself on top of a page, while an orphan line is the first line of a paragraph left on its own at the bottom of a page. It is easier to say orphan lines appear at the ‘birth’ of a paragraph while widow lines appear at the ‘death’ or end of paragraphs.
You can control widow/ Orphan lines by using the following steps.
1. Highlight the paragraph or paragraphs that you would like to control widow and orphan lines.
2. Open the Home Tab
3. Choose the Paragraph Dialog Box
4. Click on Line and Page Breaks
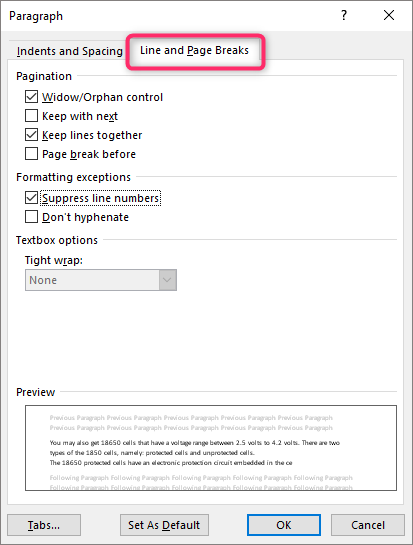
5. Choose Widow/Orphan control under the choice Pagination

6. Press OK.
In general, adding a manual line break to your Word document entails pressing the Shift + Enter buttons. This moves the cursor then allows you to start the next sentence or line. You can also break the sentence by placing the cursor on the spot you want to break the content. Press the Shift + Enter buttons. The next text continues from the next line.